How to Fix Back Window on Toyota Solara Convertible: Easy Guide
Toyota Solara convertibles offer a unique experience: fresh air, panoramic views, and classic style. But over time, owners sometimes face a common challenge—issues with the back window. Whether the window is separating from the fabric, leaking, or won’t move, it can turn a fun ride into a frustrating problem. Fixing the back window on a Toyota Solara convertible isn’t always simple, but with the right knowledge and tools, you can tackle most issues yourself or know when to call a pro. This guide walks you through the most common problems, practical solutions, and expert tips, so you can restore your convertible and enjoy the open road again.
Understanding The Back Window Problem
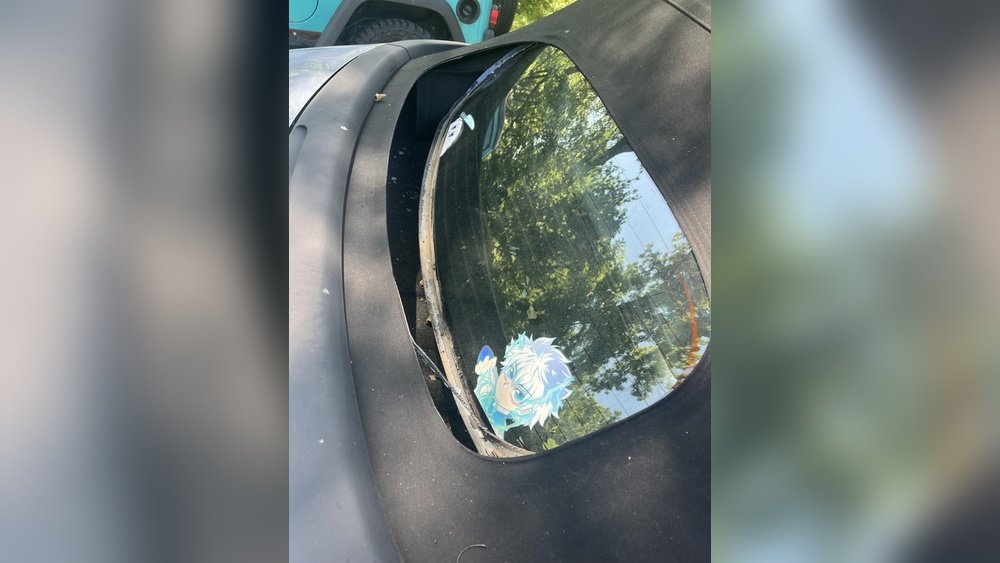
The Toyota Solara convertible’s back window is integrated into the soft top. On most models, it’s made of glass bonded to the fabric. Over time, exposure to sun, rain, and temperature changes can cause the adhesive to weaken, leading to separation. Other issues include leaks, cracks, or mechanical failures if the window is designed to move.
Why does this happen? The main reasons are:
- Age and weathering: UV rays and moisture degrade glue and fabric.
- Improper cleaning: Harsh chemicals can weaken the bond.
- Mechanical stress: Frequent up-and-down cycles stress the structure.
- Design limitations: Some adhesives used in older models were not meant to last 15+ years.
Understanding these causes helps you choose the right repair method, so you don’t just fix the symptom but address the root problem.
Diagnosing Your Back Window Issue
Before you start any repair, you need to know what’s wrong. Here are the main issues to check for:
- Separation from fabric: The glass is pulling away from the top, often at the corners or bottom edge.
- Leaks: Water enters during rain or car washes.
- Cracks or broken glass: The window itself is damaged.
- Mechanical failure: If your model has a powered window, it may not move up/down properly.
To diagnose:
- Inspect the window inside and out.
- Look for gaps, loose edges, or missing adhesive.
- Spray water over the top and check for leaks inside.
- Test any window movement (if applicable).
If the window is simply dirty or foggy, cleaning may be enough. But for separation or damage, repair is necessary.
Tools And Materials You’ll Need
Having the right tools makes the job smoother. Here’s a list for most repairs:
- Automotive adhesive or convertible top glue (choose a high-strength formula)
- Plastic trim removal tool
- Painter’s tape
- Rubbing alcohol or adhesive remover
- Clean microfiber cloths
- Clamps or heavy-duty tape
- Razor blade or utility knife
- Caulking gun (if using cartridge adhesive)
- Protective gloves
- Vacuum (for cleaning out debris)
For glass replacement:
- Replacement glass window (OEM or aftermarket)
- Silicone sealant (for waterproofing edges)
Having everything ready saves time and reduces mistakes.
Fixing Back Window Separation
Step 1: Prepare The Area
Start by cleaning the area around the window where the glass meets the fabric. Use rubbing alcohol to remove old adhesive, dirt, and oils. Dry thoroughly. If old glue is still stuck to the fabric or glass, scrape it gently with a razor blade.
Step 2: Protect The Paint And Interior
Use painter’s tape to mask off the areas around the window so excess glue doesn’t drip onto your paint or seats. Place a towel inside to protect the upholstery.
Step 3: Apply The Adhesive
Carefully apply a bead of automotive adhesive or convertible top glue along the edge where the glass meets the fabric. Use a caulking gun for even application. Press the fabric down firmly onto the glass.
Step 4: Secure And Cure
Use clamps or heavy-duty tape to hold the fabric in place while the adhesive cures. Check the product’s instructions for curing time—usually 12-24 hours. Avoid driving or opening the top during this period.
Step 5: Test For Leaks
After curing, gently spray water over the window area and check for leaks inside. If you see water, apply a thin bead of silicone sealant along the edge to seal any small gaps.
Practical Tips
- Work in a dry, shaded place. Direct sunlight can dry adhesive too quickly.
- Don’t rush the curing process; patience means a stronger bond.
- Use a high-quality glue designed for automotive fabrics and glass.

Credit: www.reddit.com
Repairing Leaks Around The Back Window
If you notice water entering the cabin, it’s often due to failed seals or shrunken fabric.
Step 1: Identify The Leak Source
Have someone spray water over the top while you sit inside and watch for drips. Mark the leaking spots with painter’s tape.
Step 2: Reseal Edges
Clean the area, then apply a thin bead of silicone sealant along the leaking edge. Smooth with a gloved finger to ensure coverage.
Step 3: Test Again
Once dry, repeat the water test. If leaks persist, check for gaps in the top or worn-out weatherstripping. Sometimes, the problem is not the window, but the rubber seals around it.
Replacing A Broken Back Window
If the glass is cracked or shattered, you need a replacement. This repair is more complex but can be done with patience.
Step 1: Buy The Right Window
Find the correct replacement window for your Toyota Solara’s year and trim. OEM parts are best for fit, but quality aftermarket options exist.
Step 2: Remove The Old Window
Carefully cut away the old adhesive using a razor blade. Remove all glass fragments and clean the area thoroughly.
Step 3: Install The New Glass
Dry-fit the new window to ensure proper alignment. Apply adhesive along the edges, then press the window into place. Secure with clamps or tape.
Step 4: Seal And Cure
Apply silicone sealant around the edges for extra waterproofing. Allow everything to cure as directed.
Step 5: Safety Check
Before driving, make sure the window is firmly attached and there are no sharp edges or leaks.
Fixing Mechanical Problems
Some Solara convertibles have powered back windows or mechanisms that help the window move with the top. If these stop working:
Step 1: Check Fuses And Switches
A blown fuse or faulty switch can stop window movement. Check your owner’s manual for fuse locations and test switches.
Step 2: Inspect The Motor And Tracks
Listen for motor noise. If the motor runs but the window doesn’t move, the track or regulator may be jammed.
Step 3: Lubricate Moving Parts
Spray a silicone lubricant on the tracks and moving parts. Avoid over-lubricating, which attracts dirt.
Step 4: Replace Faulty Components
If the motor or regulator is broken, replacement is often easier than repair. Buy parts from a trusted auto parts store or dealer.
When To Call A Professional
Not every back window problem is a DIY fix. If you notice:
- Large tears in the fabric top
- Complete detachment of the window
- Complex electrical issues
- Damage to the frame
…it’s best to consult a convertible top specialist or auto upholstery shop. They have the tools and experience for a lasting repair.
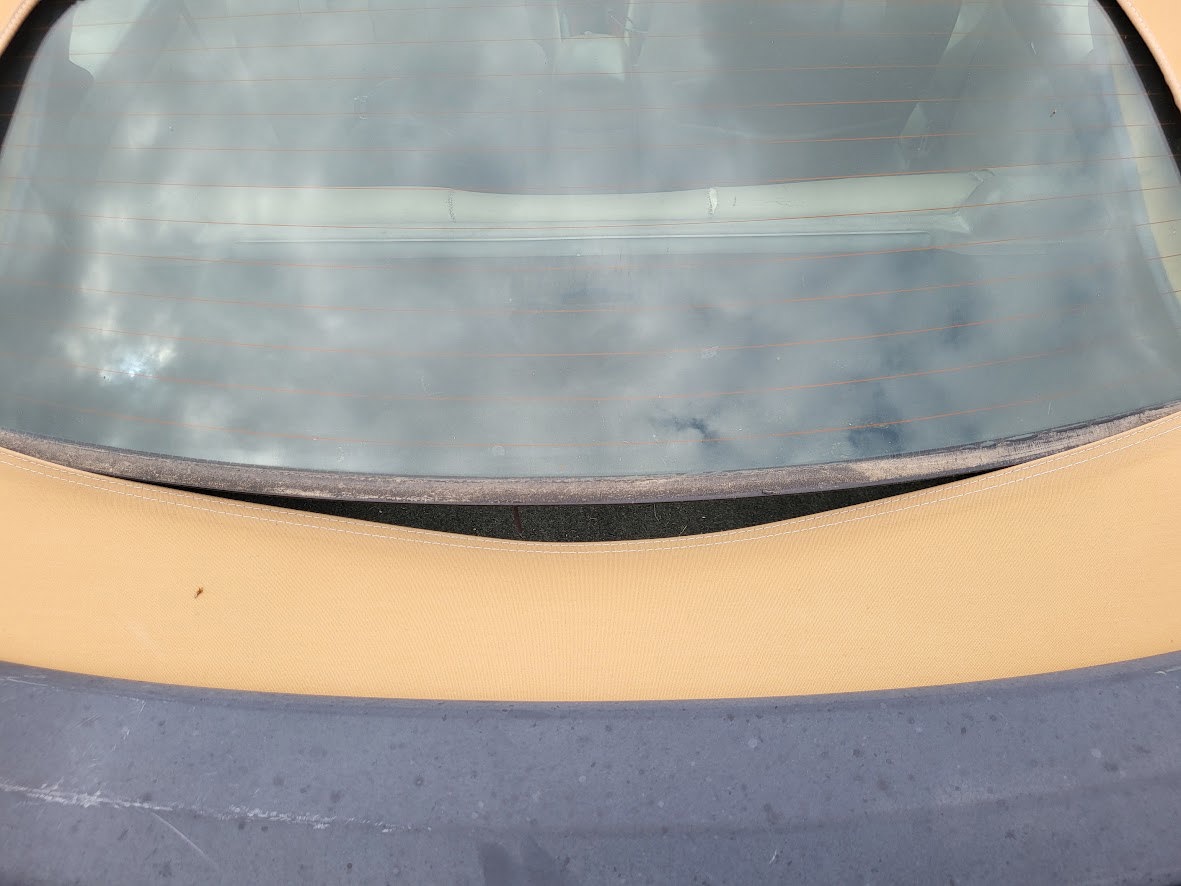
Credit: mechanics.stackexchange.com
Cost Comparison: Diy Vs. Professional Repair
Here’s a quick comparison of typical costs for fixing a Solara convertible back window.
| Repair Method | DIY Cost (USD) | Professional Cost (USD) |
|---|---|---|
| Adhesive Reseal | $30–$80 | $150–$400 |
| Glass Replacement | $150–$350 | $500–$1000 |
| Full Top Replacement | $400–$800 (parts only) | $1200–$2000 |
DIY can save money, but a poor repair may lead to leaks or further damage.
Common Mistakes To Avoid
- Using household glues: Regular glues aren’t strong or flexible enough for automotive use. Only use adhesives rated for convertible tops.
- Skipping surface prep: Not cleaning surfaces leads to weak bonds.
- Not allowing full cure time: Rushing the process can ruin your work.
- Over-applying sealant: Excess silicone looks messy and can trap water.
- Ignoring leaks: Small leaks can cause mold and interior damage over time.
- Forgetting UV protection: After repair, apply a UV protectant to the fabric for longer life.
How Long Will The Repair Last?
A well-done adhesive repair can last several years if you care for the top and park in the shade when possible. However, the materials on older convertibles eventually wear out. If you find yourself fixing the window repeatedly, it may be time to consider a full top replacement.
Here’s a look at typical repair lifespans:
| Repair Type | Expected Lifespan | Main Risks |
|---|---|---|
| Adhesive Reseal | 2–5 years | Separation in high heat/cold |
| Glass Replacement | 5–10 years | Adhesive failure if poorly installed |
| Full Top Replacement | 7–15 years | UV and weather damage |
Practical Maintenance Tips
- Clean regularly with mild soap and water; avoid harsh chemicals.
- Inspect seals every few months for early signs of wear.
- Park in the shade when possible to reduce UV damage.
- Apply fabric protectant twice a year to extend lifespan.
- Operate the top only when the window and seals are dry.
Many Solara owners forget that regular care is the best way to prevent big repairs.
Non-obvious Insights That Make A Difference
- Adhesive temperature matters: The ideal temperature for applying convertible top adhesive is between 65–80°F (18–27°C). If it’s too cold or hot, the glue won’t bond well. Many beginners miss this detail, leading to early failure.
- Seam stress is a warning: If you see the stitching near the window starting to pull or fray, it’s a sign that the fabric is shrinking. Resealing the glass alone won’t solve the issue—you may need to reinforce or replace that section.
- Aftermarket windows aren’t always a perfect fit: Even high-rated aftermarket glass may require slight adjustments. Test-fit before applying adhesive.
When Replacement Is The Best Option
If the fabric around the window is brittle, torn, or shrunken, repairing just the window is a temporary fix. In these cases, a full convertible top replacement is the best long-term solution. New tops often include an integrated back window and improved adhesives. While the cost is higher, it can add years of use and boost resale value.

Credit: www.youtube.com
Where To Find Quality Parts And Help
For authentic Toyota Solara convertible parts, check with authorized Toyota dealers or reputable auto parts suppliers. Online forums and groups can also offer recommendations. For official guidance, see the Toyota owner’s manual or the Toyota Solara Wikipedia page.
Frequently Asked Questions
How Do I Know If My Solara’s Back Window Needs Replacing Or Just Resealing?
If the glass is intact but has separated from the fabric, resealing is often enough. If the glass is cracked, shattered, or the fabric is torn around the window, replacement is recommended.
What Adhesive Should I Use For My Convertible Back Window?
Use a high-strength automotive adhesive specifically designed for convertible tops and glass. Do not use household glue or silicone alone, as they won’t hold under stress and weather.
Can I Drive My Car While The Adhesive Is Curing?
No. Driving before full cure can shift the window and weaken the bond. Most adhesives need 12–24 hours to set, so keep the car parked during this time.
How Much Does It Cost To Fix The Back Window At A Shop?
Professional resealing typically costs $150–$400, while full glass or top replacement can cost $500–$2000 depending on parts and labor.
Will Fixing The Window Stop Leaks Completely?
If done correctly and all seals are addressed, fixing the window should stop leaks. However, check weatherstripping and fabric for other problem areas, as leaks may come from more than one source.
Solving back window problems on your Toyota Solara convertible takes patience, the right materials, and attention to detail. With this guide, you’re ready to tackle the repair—or make an informed choice about professional help—so you can get back to enjoying open-top driving without worry.